Setup
Preparation
It’s recommended that the following is prepared before the streaming rack is used on site:
In case of Audio recording, check if there’s enough space on the microSD card
In case of Video recording, check if there’s enough space on the SSD
In case of Streaming, check if there’s internet access via Ethernet on site
In case of custom Media, prepare & upload it
Package list
The following things should be packaged:
The streaming rack itself
The grey RAKO boxes with the streaming equipment (PTZ equipment is optional)
The 4G router, if Streaming is required
The LED lights for low lighting sites
On site
Streaming
Set up the streaming rack, as soon as you arrive at the meetup location
Connect the Cudy, or Netgear Nighthawk mobile router
Check where the nearest network towers are and point the mobile antennas to it
Test if the internet connection matches the requirements for the streaming
Important
Check the internet connection by monitoring the bitrate & packet loss / cache of the ATEM Mini. There are different requirements based on the image quality:
High quality: Up to 9 Mbps
Medium quality: Up to 7 Mbps
Low quality: Up to 4.5 Mbps
Hint
External antennas with line-of-sight to the tower work best.
Camera setup
Decide if you want to use the static Panasonic cameras in the rack, or the more sophisticated PTZ cameras of the RAKO box.
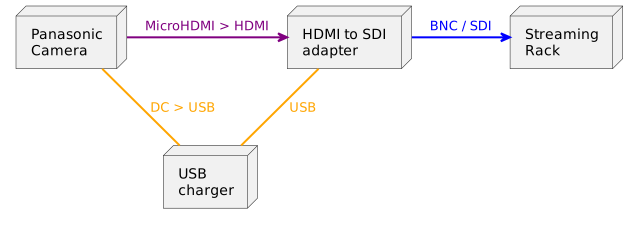
The setup of the Panasonic cameras looks like this:
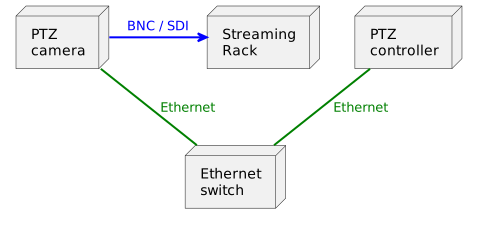
The setup of the PTZ cameras looks like this:
Hint
The PTZ controller & PTZ cameras are powered via PoE, so no power supplies are required.
HDMI splitter
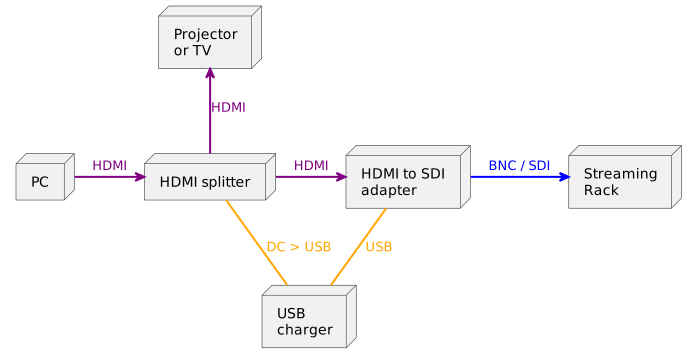
In case the speaker shares his screen on a projector, you might want to install the HDMI splitter:
Microphone setup
For the RØDE Wireless GO II, ensure that the gain is set to -15 dB and split mode is active (stereo, resp. one microphone on each channel). Create a sound test to check for any issues.
Light setup
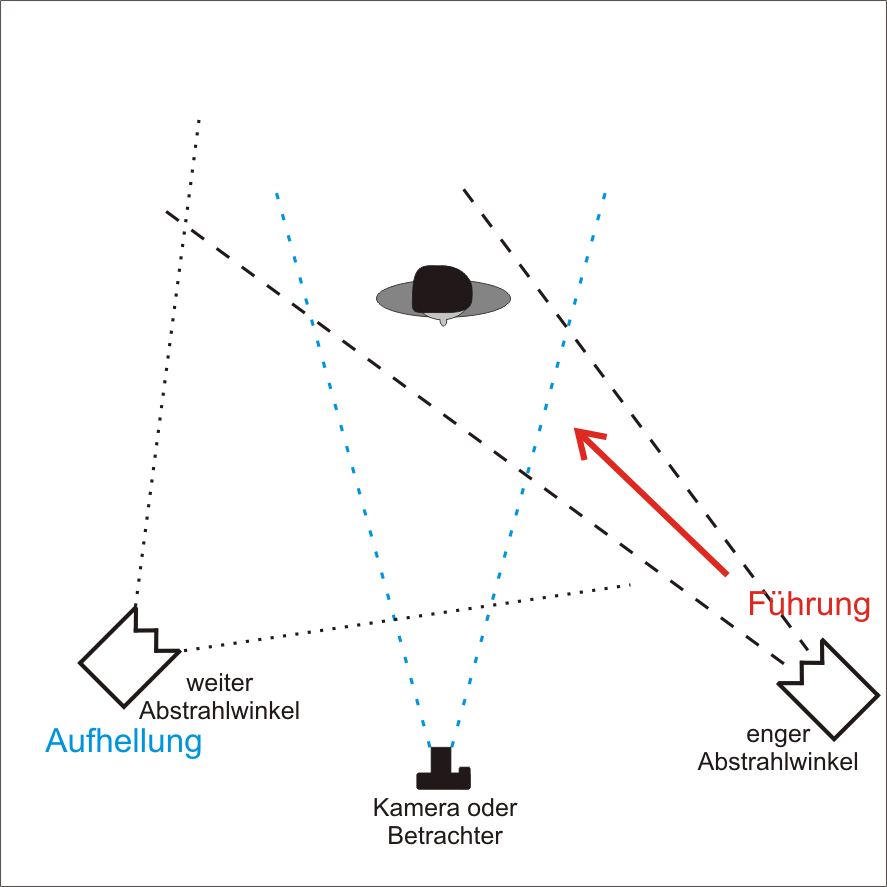
Set the key light: to the side of the camera, 45° from above, narrow angle, facing the subject’s face.
Set the fill light: wide angle, on the other side of the camera.
Keep light sources consistent: all light sources should have the same color temperature to avoid color differences.
Optional: Set the contour light: as backlighting to create an edge.
Optional: Darken windows to minimize the influence of changes in daylight.
White balance
White balance is the process of adjusting the colors in an image to make sure that white objects appear white.
If you are using the Panasonic cameras you can manually white balance the cameras via the settings.
If you are using the PTZ cameras you can white balance the cameras by:
Taking the white balancing cart from the rack.
Holding the white balancing cart in front of a camera at the position where the speaker will be.
Making sure that the white balancing cart fills the camera’s frame completely.
Pressing the “white balancing” button on the stream deck.
Waiting for the camera to adjust the white balance automatically.
Danger
When using multiple cameras, set the identical white balance on all cameras.
Hint
If no balancing cart is available, use 4’200 Kelvin for mixed lighting indoors.
JBL Speakers
You can use the JBL speakers at the event. Here are some instructions on how to connect the speakers:

Hint
Make sure that you test for a feedback loop. Try out different dB volumes on the Microphones.